If you are in this place now and are feeling overwhelmed with the idea of following the many steps involved you're not alone. I procrastinated starting this project for a long time because it seemed too tedious and too difficult for my skill level. As it turns out the work is actually very simple, but when you feel like you're ready to rush through and half-ass a step STOP what you're doing and leave it for another day. I'll say that again... Do not half-ass any of the steps in the process.
I do want to preface my instructions with a couple of disclaimers:
- I have never refinished anything before, so if my steps aren't 100% correct I apologize in advance.
- The products I used I happened to pick up at Home Depot, so I'm not endorsing these particular brands as I have no basis for comparison.
- I used a standard wood-filler and I wasn't very happy with the color results after staining. If you have an alternative suggestion I'd love to hear it!
- I'm still trying to get this picture thing down, so there are sections without a photo to illustrate what I did.
OK without further adieu...
Items you will need:
- Degreaser/cleaner (I used TSP - Trisodium Phosphate)
- Sandpaper in varying grits - I used 100/150/220/600
- A sanding block, palm sander, or other tool to hold your paper
- Scrap cloths
- Paint brushes for applying product
- Wood filler
- Pre-stain Conditioner (an optional step that I completed and would complete again)
- Wood Stain
- Polycrylic (protective finish - I used a semi-gloss)
- Dust mask
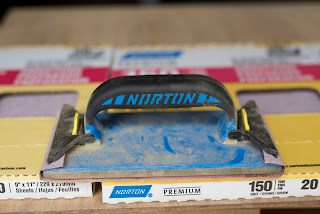
I used this sander with a handle on it and I LOVE it. The sandpaper is really easy to hold and the handle is comfortable.
Instructions - EASY! You can totally do this!
I'm already slacking on the photos. I wish I had taken a before of the top view. There was some pretty significant water damage and the surface was warped and bubbling. This is the before.
- To get started you need to clean your piece. Follow the instructions on the cleaner you choose and let it dry.
- Once you have a clean dry piece you are ready to begin sanding. Put on your dust mask! Start with a medium grit paper (100) and work on the entire piece until you have a uniform color and texture. Any major flaws as well as the previous stain will be removed in this step. Dust off and rub your hand over the surface to ensure that you haven't missed any spots.
These photos are after the first sanding
- Move on to the next sand paper (150) and go over the entire thing again. You'll notice the progression from rough to smooth in the texture and each sandpaper goes faster than the previous. Again, dust everything off and rub your hand over the surface to make sure the texture is even.
- You're rocking this... Get out your 220 grit paper and do a final surface sand to smooth everything out.
Completely Sanded!
- Once you've completed all your sanding make yourself a cocktail because you're done with the hard part! Or if you are like me this will be the 3rd time you will be having a cocktail and toasting to your awesome handiwork (I sanded one paper a day - I have needy kids).
- Now you are going to fill any holes or gouges using the wood filler if needed. You'll need to repeat the sanding steps over your repaired areas (if you have them).
High Five! That nail hole is history!
- Next you are going to apply the pre-stain conditioner. Remember to read the instructions in case there is some variation between what you buy and what I used. Also, note that you are supposed to apply the stain within 2 hours of the pre-stain conditioner, so make sure you have time for both steps.
- Brush on the pre-stain wood conditioner and allow it to penetrate the wood for 5-15 minutes. Then wipe the wood with a cloth to get rid of any excess.
You'll notice a big color difference after you apply the conditioner.
- Staining Party!!! Ok now you are going to add the stain that you chose for your particular taste and preference. I chose a dark walnut.
- Brush on the stain and again you'll let it sit for 5-15 minutes. The longer it sits the darker the stain will be. After the allotted time wipe of the excess and let the stain dry completely. If you want the color to be darker you will need to repeat this step. I liked the color of mine and did not stain twice.
Don't forget to wipe off your excess stain!
- You're getting close to the finish line! The last step is to apply the Polycrylic. I personally loved this product and thought it gave a nice finish similar to new furniture. I will warn you that it is not as forgiving as the stain and pre-conditioner. You always need to apply in the direction of the grain, but in this case you aren't going to wipe off, so any drips etc... will have to be sanded off. Also, note that I did NOT follow the product instructions of using a 220 grit between coats. I felt that the surface was not smooth enough and so I switched. I think you'll be happier with this finish too.
- Stir and apply with a brush. Let it dry for 2 hours and then sand with the 600 grit paper. Repeat 2 more times for a total of 3 coats of Polycrylic.
- Apply new hardware if needed and you are DONE!
- You are a furniture refinishing Bad-Ass! Take a bow!
The AFTER. I'll take a photo of it in the room once the toys are cleaned up!


