Sunday, November 24, 2013

Project Simple Desk Refinish

I haven't updated this blog in a long time.  I started two projects over the summer that I was really excited to write about.  However, both of those projects are taking a lot longer than I originally thought they would and so their posts have been delayed.  I've been busy though and each of my projects are going really well.  I never thought that I could do the things that I'm doing and it has saved us a lot of money.  I now truly understand the value in what contractors and artisans charge for their services, but anyone can do it themselves with a little bit lot of patience.

So... in this post I want to touch on more furniture refinishing.  I followed the same process that I used HERE but I want to talk specifically about a product that I found to be AMAZING!  Spray paint... Seriously, spray paint.  There are some unbelievable products on the market that give much better results that products of the past and the nozzles have also come a long way. Skip to the very end if you want to see what I used.

For organization's sake let's start at the beginning.

Here is a desk I found at REstore here in Evergreen.  I paid $47 dollars for it.  You can click on the pictures to get a better look.


The desk is a cool little mid-century mod made by Stanley.  It has dovetail joints and is pretty sturdy.  (At this point I have to apologize for my pathetic photos.  I got so excited that I started working on it before I realized that I didn't take before pictures.) The desk looked like it had seriously been dropped on all 4 corners and no one would have bought it because it had a veneer on the desk top.  Most people steer clear of these pieces because they think that they cannot be refinished, but they can if you are careful.  Anyway, the finish was really yellowed from age and someone had carved shapes into the top and sides.  All in all it looked like crap.  For time savings I even used an electric sander, which did not cut through the veneer.  Here it is after the final sanding - I worked from 80 grit to 150/220.  You can see detailed instructions in my original post.


After sanding I patched the corners using a wood filler and re-sanded those areas.  Once the piece was ready I applied a wood conditioner, stain, and 3 coats of Polycrylic in a semi-gloss.  I believe I mentioned how much I love the water based Polycrylic in my original post, but in case I didn't - It is awesome!  I'll also say again that the directions tell you to sand with 220 grit in between coats, but I highly recommend using 600.  It makes it super smooth.

Here's a photo after the wood conditioner.  This product really starts to change the color of the wood.
I finished the desk in about 2 weeks.  The project itself was really quick, but I had some weather issues that prevented me from working on it everyday.  I also have the tendency to skip steps when I'm bored, so I take a break when I start to feel as though I'm going to half-ass it.  If you are like me you are probably thinking that there is no way in hell you're going to commit to these types of projects, but you can.  Take your time, take days off, and it will all work out.  You'll save money, you'll end up with a better made product, and more than likely no one else is going to have the same piece.

Here is the after picture... Don't forget to read below!!!! Don't leave yet!

If you notice the hardware on the drawers and the metal caps on the bottom of the legs do not match.  You'd think that for all the talking about NOT half-assing your projects that I'd follow my own advice and get the photos right, but I didn't.  The crux of the issue is that I have a one track mind and when I'm focused on one thing everything else goes out the door, but let me tell you about spray paint.  I did not want to spend much money on this project.  I used the wood conditioner, stain, and polycrylic from my last project.  I didn't want to shop for or pay for new hardware and the original hardware was pretty cool.  I decided to paint them.  I bought this:

I cannot say enough good things about this paint.  The action of the nozzles is awesome, the coverage is awesome, and the finish looks as though it came that way.  I simply took off the hardware, sprayed it with 3 coats of paint and put it back on.  For the caps on the bottom of the legs, I bagged the desk, taped a seal, and sprayed - that was it.  The finish is even smooth unlike spray paints I've used in the past and there are a variety of finishes available.  I raise my glass of wine to you Rust-Oleum and I'm not even getting a kickback!  *** Noticenbehind that can of spray paint that I am on my way to refinishing those kitchen cabinets.  I will write about it when they are done.  It is the project to end all projects.  That's all for now!

Saturday, July 13, 2013

Project Sweet Tooth

All of the girls in my house LOVE sweets.  I try to keep the sugar intake low and I've adopted the rule that I won't purchase any pre-made desserts for the house (except ice cream, but I'll eventually get my dream ice cream maker!).  If we want to eat it we have to make it!  In the summer I prefer not to use the oven because it heats up the entire kitchen, so we find other ways to satisfy our cravings rather than baking.  The majority of the time we find simple joy in a cut up melon or some strawberries with whipped cream.  (Unlike the winter, a subtle sweet satisfies in the heat.)  However, there are times when a girl just needs something creamy or chocolaty.  Today's treat is nostalgic because it was one of my favorites when I was a girl.  Do you remember Jello Pudding Pops? Well, these frozen pops taste just like the ones I ate as a child and they are super easy to make.

You will need:
  • A box of instant pudding mix - I like chocolate
  • Milk
  • A tub of Cool Whip
  • Popsicle molds
Make the pudding and refrigerate it until it is set.  Mix in 1/2 of the tub of Cool Whip and mix together until blended.  Spoon into popsicle molds and freeze.  Isn't that the easiest recipe you've ever seen?!!!  Before serving you'll want to dip the outside of the mold in warm water or run it under the faucet to loosen it up.  Yum!


On a side note: I got my molds from Bed Bath and Beyond.  They do not have them on their website, but I found them in store for only $4.99.  They have been fantastic!  When we are not filling them with pudding pop mixture we usually use fruit smoothies, which are great for adding in spinach, kale, or squash in addition to your berries.   My children think they are having dessert.  Berries hide everything!

Saturday, June 29, 2013

Project: Furniture Refinish

There are a lot of reasons that I am interested in refinishing pieces of furniture.  For example, my personal taste does not match what exists in my bank account.  In my ideal world all of my furniture would come from local mom and pop type builders who still build things to last and harvest their products responsibly, or antiques, which are even more expensive. However, even if I could afford to purchase these pieces my children would immediately gouge them with a toy or color on them with a sharpie.  (Many of the crayon/marker companies are now making washable versions, but my kids always seem to find the one crayon in the box that is permanent before they color on things they aren't supposed to.) And lastly because I have in my "collection" some furniture that is damaged and badly in need of repair. So, I decided to dive in and just do it!

If you are in this place now and are feeling overwhelmed with the idea of following the many steps involved you're not alone.  I procrastinated starting this project for a long time because it seemed too tedious and too difficult for my skill level.  As it turns out the work is actually very simple, but when you feel like you're ready to rush through and half-ass a step STOP what you're doing and leave it for another day.  I'll say that again... Do not half-ass any of the steps in the process.

I do want to preface my instructions with a couple of disclaimers:
  1. I have never refinished anything before, so if my steps aren't 100% correct I apologize in advance.
  2. The products I used I happened to pick up at Home Depot, so I'm not endorsing these particular brands as I have no basis for comparison.
  3. I used a standard wood-filler and I wasn't very happy with the color results after staining.  If you have an alternative suggestion I'd love to hear it!
  4. I'm still trying to get this picture thing down, so there are sections without a photo to illustrate what I did.
OK without further adieu...

Items you will need:
  • Degreaser/cleaner (I used TSP - Trisodium Phosphate)
  • Sandpaper in varying grits - I used 100/150/220/600
  • A sanding block, palm sander, or other tool to hold your paper
  • Scrap cloths
  • Paint brushes for applying product
  • Wood filler
  • Pre-stain Conditioner (an optional step that I completed and would complete again)
  • Wood Stain
  • Polycrylic (protective finish - I used a semi-gloss)
  • Dust mask

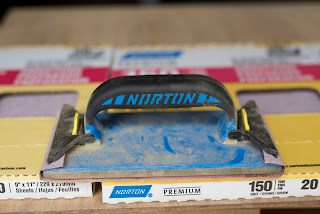
I used this sander with a handle on it and I LOVE it.  The sandpaper is really easy to hold and the handle is comfortable.

Instructions - EASY!  You can totally do this!


I'm already slacking on the photos.  I wish I had taken a before of the top view. There was some pretty significant water damage and the surface was warped and bubbling.  This is the before.


  • To get started you need to clean your piece.  Follow the instructions on the cleaner you choose and let it dry.  
  • Once you have a clean dry piece you are ready to begin sanding. Put on your dust mask! Start with a medium grit paper (100) and work on the entire piece until you have a uniform color and texture.  Any major flaws as well as the previous stain will be removed in this step.  Dust off and rub your hand over the surface to ensure that you haven't missed any spots.
These photos are after the first sanding

  • Move on to the next sand paper (150) and go over the entire thing again.  You'll notice the progression from rough to smooth in the texture and each sandpaper goes faster than the previous.  Again, dust everything off and rub your hand over the surface to make sure the texture is even.
  • You're rocking this... Get out your 220 grit paper and do a final surface sand to smooth everything out.

Completely Sanded!

  • Once you've completed all your sanding make yourself a cocktail because you're done with the hard part!  Or if you are like me this will be the 3rd time you will be having a cocktail and toasting to your awesome handiwork (I sanded one paper a day - I have needy kids).
  • Now you are going to fill any holes or gouges using the wood filler if needed.  You'll need to repeat the sanding steps over your repaired areas (if you have them).

High Five! That nail hole is history!
  • Next you are going to apply the pre-stain conditioner.  Remember to read the instructions in case there is some variation between what you buy and what I used.  Also, note that you are supposed to apply the stain within 2 hours of the pre-stain conditioner, so make sure you have time for both steps.
  • Brush on the pre-stain wood conditioner and allow it to penetrate the wood for 5-15 minutes. Then wipe the wood with a cloth to get rid of any excess.


You'll notice a big color difference after you apply the conditioner.
  • Staining Party!!!  Ok now you are going to add the stain that you chose for your particular taste and preference.  I chose a dark walnut.  
  • Brush on the stain and again you'll let it sit for 5-15 minutes.  The longer it sits the darker the stain will be.  After the allotted time wipe of the excess and let the stain dry completely.  If you want the color to be darker you will need to repeat this step.  I liked the color of mine and did not stain twice.


Don't forget to wipe off your excess stain!

  • You're getting close to the finish line! The last step is to apply the Polycrylic.  I personally loved this product and thought it gave a nice finish similar to new furniture.  I will warn you that it is not as forgiving as the stain and pre-conditioner.  You always need to apply in the direction of the grain, but in this case you aren't going to wipe off, so any drips etc... will have to be sanded off.  Also, note that I did NOT follow the product instructions of using a 220 grit between coats.  I felt that the surface was not smooth enough and so I switched.  I think you'll be happier with this finish too.
  • Stir and apply with a brush.  Let it dry for 2 hours and then sand with the 600 grit paper. Repeat 2 more times for a total of 3 coats of Polycrylic.
  • Apply new hardware if needed and you are DONE!
  • You are a furniture refinishing Bad-Ass! Take a bow!


The AFTER.  I'll take a photo of it in the room once the toys are cleaned up!

Wednesday, May 15, 2013

Project Cold-frame

I do realize that this blog seems to be headed in the direction of some kind of amateur yard-work assignment, but I assure you that it will cover additional topics soon.  Finishing the garden projects is at the forefront of my to-do list because these things need to be completed in early spring.  It is sort of a project curb appeal too if you will...  Anyway, coming soon I will cover other topics such as: preserving an animal skull (death stinks - quite literally) and refinishing a piece of furniture (much easier than I anticipated) but both of these projects are not quite finished. So, without further adieu onto today's project the cold-frame.

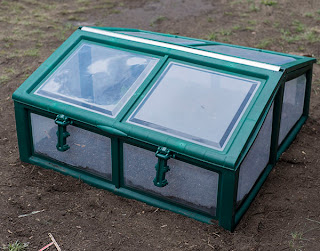
I've mentioned that I live in Evergreen at about 7500 ft above sea level.  I also will now admit to having the blackest of black thumbs, but I have been planting seeds with my daughters for the last 3 seasons and I am starting to get an idea of what I can and cannot grow in a shorter growing season at a high altitude.  To begin I've learned that I cannot grow squash.  Tomatoes are impossible and lavender won't even sprout.  On the other hand rhubarb and chard grow really well up here as do spinach, radishes, carrots, cilantro, raspberries and lettuce.  This season we planted various lettuces, spinach, kale, chard, rhubarb, radish, green beans, basil, and a type of yellow strawberry (I'm not sure if it will grow yet). To work with the shorter season I focused on plants that do not need as much time to grow (mostly) and I purchased an inexpensive cold-frame to help extend my time a little.  Some of the seeds were planted in an area exposed to the elements because the cold-frame isn't large, but I did transplant my sprouted seedlings inside and they survived through frost and snow.  In hindsight, I wish that I would have purchased two frames.  In case you are wondering... I purchased all my seeds through Baker Creek Heirloom Seed Co because the seeds are all non-GMO.  I've also found that these seeds actually sprout! I know it sounds silly, but I've planted sooooo many seeds to no avail in the past.  We planted a couple of weeks ago and things are looking beautiful!  The girls are really excited to see the seeds that they planted sprout into life.

To those of you wanting to start your own garden my best advice on this subject would be to read the instructions on your seed package and try different things.  We all have different obstacles in regard to our own locations for planting, but do not be discouraged.  If you live at a lower elevation your success will come much easier!  My first season only my carrots grew and I am becoming more able with each passing year.  Below are pictures from planting day.


Wednesday, May 8, 2013

Project Terrarium

Recently, I visited a floral shop (for lack of a better name) here in Evergreen.  I plan to make a special visit there soon to create some terrariums with air plants, but I'll make a separate post about that project as well as that store after my visit.  I can say that it was beautiful and I'm hoping to provide some good tips from the owner - who was awesome.  Anyway, I digress... After that visit I felt inspired and wanted to create a couple of my own terrariums in the mean time.  ***At this point I do have to note that I am on a budget and it would not be possible for me to create every terrarium at a shop or through ordering numerous pieces of glassware from West Elm and other retailers, although, I do want to mimic the look in my own home.  I made a trip to Home Depot and found some very inexpensive succulents as well as the other gardening supplies I would need.  At Target I found some glass jars with lids in the kitchen section for $13 and $8.  You could probably find even better deals on glassware from garage sales or may even have some pieces already in your collection.  Here is the list of all the items you will need:

  • Plants - * read the labels carefully for water and sunlight needs
  • Glassware or any planter you'd like to use
  • Soil
  • Activated charcoal 
  • River rock or decorative stones (optional, but it does help with soil drainage)
  • Moss - I am going to transplant some from my yard, so it isn't pictured in my project
Then, it is as simple as layering in the ingredients.  I let my daughters do most of the work.  They started by creating a layer of stone along the bottom.  Then we placed about 2 inches of activated charcoal on top of the stones.  After, we filled the remaining area with soil and transplanted the plants.  When you add the moss you want to cover the surface of the soil around the plants.  Water according to the needs of your plant selection and place in a sunny area of your home. 

*After creating my terrariums I have noticed an excessive amount of moisture in the soil and have opted to leave the lids off of my jars because the plants I chose do not need a lot of water.  

Voila! Inexpensive terrariums that look beautiful.


Wednesday, May 1, 2013

Project Compost

My kids go to a Montessori and the curriculum is chock full of Earth friendly works that make me feel guilty as a parent that I'm not incorporating more of this kind of agenda at home - it is their generation that they are working to preserve right?  I should probably work harder to leave something for them and my potential grandchildren...  Anyway, we started recycling a while ago, but one of the next steps my 5 year old wanted to take was to start a compost bin.  For months she has been telling me that we can compost tissues that she has blown her nose in and random bits of food she hasn't finished.  She has even gone far enough as to try to save these items for our future compost pile.  I decided that we were finally going to purchase or build one this spring.

After doing a little research I decided that it would be better to purchase a sealed unit because we are in the mountains and raccoons, mice, and chipmunks are an issue.  It is hard enough to keep mice out of the house without placing a welcome sign in the yard.  I settled on an inexpensive two compartment tumbler from Home Depot because it was in stock and it seemed as though none of them had great reviews.  My husband put it together over a beer and there were a LOT of screws.  It was ready to go we just needed to add our Brown (carbon rich) and Green (nitrogen rich) materials.  I read a few sites, but found this one to be the most informative.

It is all set up and we are using it daily.  I have to say that I do high recommend getting a smaller sealed container to keep under the kitchen sink so you don't have to make frequent trips outside.  The pictures below are from my cell phone - I promise to start using my actual camera soon!


Sunday, April 28, 2013

One Post Today

I've decided to start writing about the many projects that have, until now, been on a mental to do list that I never get around to working on.  My name is Sharifa.  I have three kids and I stay home with them.  My son is 16 and my daughters are 5 and 3.  Basically, my full-time job consists of cleaning, cooking, and being at the beck and call of other people.  Now, don't get me wrong I love them and I'm thankful to be able to be home with them, but that mental to do list is getting longer and I am feeling out of touch with my previous self.  I used to be organized and I didn't procrastinate (nearly as often).  I was able to do things for my own personal well being and I enjoyed being creative. I was my first priority and now I am my last.  After having my daughters I found that you just have to let things go in order to be sane (even the small stuff like showering and using the bathroom without a live studio audience).  Fast forward five years and I find myself wondering what happened.  Now that my younger two are getting older and more self-sufficient I've realized that I'm still living my life like they are infants.  I need to take control of my time and find the path to balancing home, health, family and self.  So... I'm starting now with One Project Today.  Notice that it isn't one project A day because that is my first goal - to be realistic and isn't that a big one all by itself?